
 Always thinking about useful things I could do with a Raspberry Pi my wife asked me about making a time-lapse camera to record some building work at Lindengate, a local mental health gardening charity she volunteers at. While there are a number of Pi camera weatherproof products in the market the challenge here was to spend as little money as possible. You can see one of the short films my wife created using the camera by following this link to Lindergate’s facebook page.
The detail of the build is follows….
From a practical perspective the camera needed to be left unattended for at least 3-4 days at a time, not a problem from a storage perspective but it was an issue in terms of power the site is quite spread out and there was no practical way to get power to the place she wanted to film from.

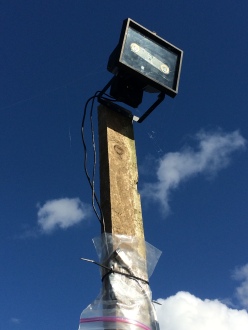
The obvious logical choice of electronics was a Pi Zero and Pi camera, then looking around the garage a realised that if I stripped out the internals from a spare security light I could easily attach the pi to the glass window using a ‘zeroview’ I already had – effectively for free. This setup also have the advantage of not looking very interesting as people are used to seeing this sort of security light around.

Rather than try and fit batteries inside the enclosure I opted for taking out a lead long enough to get to a separate waterproof box with the power supply in. As you can see in the picture I have soldered the power lines onto the Pi, this was simply because I did not have a long USB to micro-USB cable.
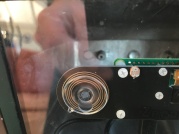
The only other change I made was to include a light dependent resistor [LDR] this is attached between GPIO pins 39 [0V] and 50 [GPIO 21] and is mounted through the zeroview board by cutting a small slot with a needle file. The GPIO 21 line is configured as an input with the weak internal pull up resistor enabled. This creates a potential divider so a low on this pin indicates daytime, a high darkness. This allows me to keep power usage to a minimum by not taking pictures after dark. This setup also avoided the need for any extra components other than the LDR.
There is no accessible wifi on the site so to download the captured pictures I simply plug in a USB wifi dongle to a short micro-USB to socket lead I brought out of the enclosure. Then connect via a laptop running VNC and locally a ‘created’ temporary network using a HooToo Wireless Travel Router. Again this kept the power down as I could disconnect the dongle when not needed – protecting the USB connection with a plastic bag !
 I tried a number of different power solutions the simplest being USB battery packs, with a large one I could get about 6 days, but main difficulty I had was that newer ones include a sensing circuit that shut the outputs down if the power drain is below a certain level. So they are fine to run a normal pi 3 but with the zero I found that periodically they would turn off which was not not much use. So going back to the garage I found a car battery, 12V to 5 volt converter and a solar panel from previous ‘projects’. With this combination I have kept the camera powered for over 2 weeks in good weather without a problem. I am doing a bit more work on monitoring the power usage so I can understand how long it is safe to leave the camera for, a bit better – that will be the subject of later blog I hope.
I kept the s/w really quite simple – you can download a copy of the code from my github. It is set up to take a picture every 10 minutes, but you can change this. The resulting pictures then stored in a single folder. The software is actually a cut down version of program I use to capture and upload pictures of our chicken run to the net ! It is setup to auto run on power up – you can see how I do this here on my site.
The actual video was created using iMovie on a mac portable but there are a variety of other free and paid for editing packages that will allow you to stitch still photos together to make a film. You can see the results here on Lindergate’s facebook page.

The new cabin mid build
